Table of Contents
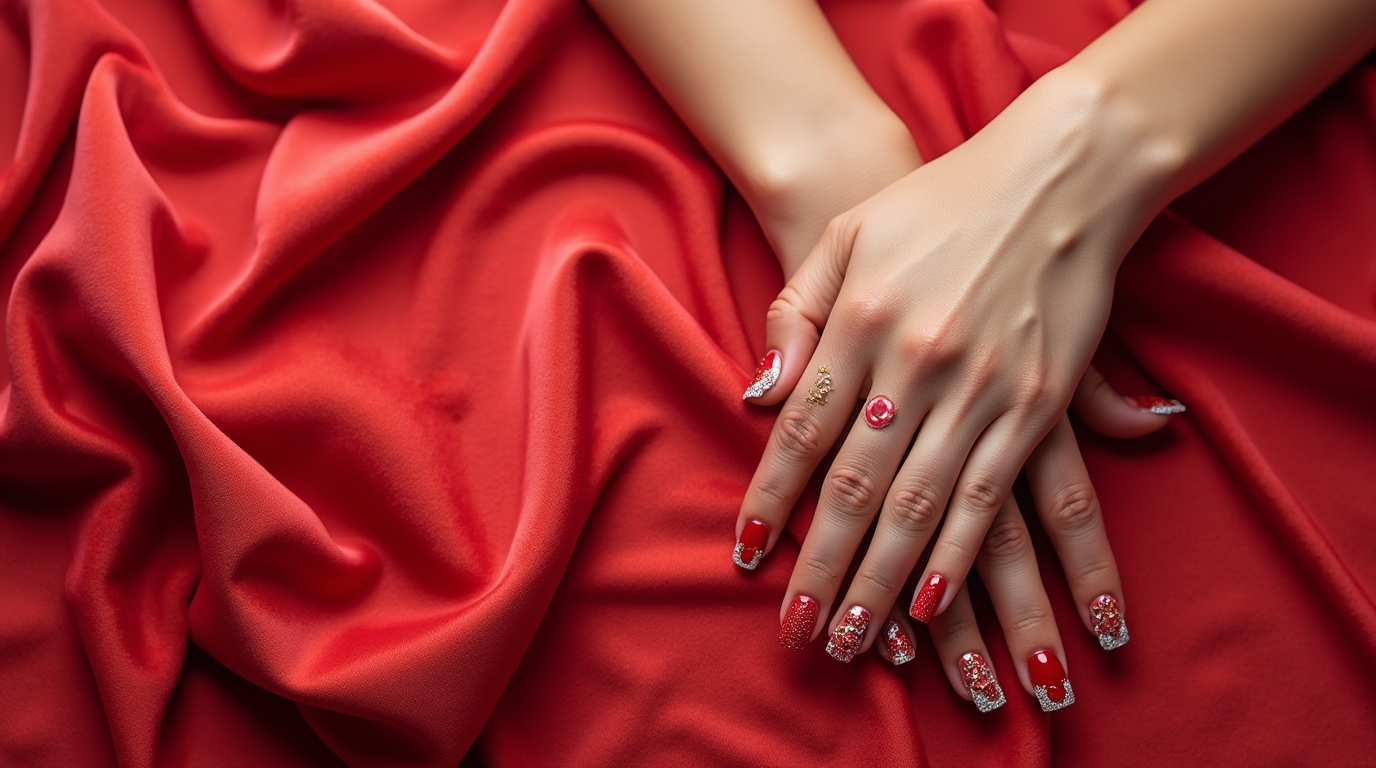
Thinking about your next nail design? Red nails with silver are timeless and elegant. Winter is the best time for red nails, perfect for holiday parties and winter fun. You can pick from ten unique styles, like matte and glitter ombre.
Red nail art is classic. Adding silver makes it stunning for any event or daily look.
Looking for something bold or subtle? Red and silver nails have it all. Choose classic cherry red for timeless elegance or chrome silver for a modern mirror-like finish.
Key Takeaways
- Red nails are a timeless choice, perfect for special occasions or everyday wear.
- Silver adds a touch of glamour and chic to your look, making it ideal for red nail art designs.
- Winter is a peak time for red nail designs, with ten unique styles to choose from.
- Red and silver nails offer a wide range of possibilities, from bold geometric patterns to subtle glitter accents.
- Classic cherry red and chrome silver nails are popular choices for their elegance and modern look.
- Red nail art designs can be paired with other colors, such as white, navy blue, or blush pink, to create a unique look.
The Timeless Appeal of Red and Silver Nails
Red and silver nails have been a favorite for years. Their timeless appeal comes from the rich history of red in nail art. BTArtbox Nails shows us that sparkling red glitter nail ideas are a must-try in 2024. You can make stunning red nail art designs that are both elegant and trendy with the right tools and materials.
Red and silver nails are perfect for any occasion. You can choose white red nail art or go bold with an all-red look. With today’s metallic nail design trends, you can get a salon-quality look at home.
Popular nail art trends include glitter-infused designs, ombré nails, and marble nail designs. You can also try geometric patterns, negative space nail art, or studded nail designs for a unique look. Social media is full of inspiration, from celebrities like Zendaya and Selena Gomez to nail art enthusiasts on TikTok.
Historical Significance of Red in Nail Art
Red nail lacquer has a long history. In Ancient Egypt, women painted their nails red to show status. In China, royalty used red nail coloring as early as 3000 BC. Today, you can find many red nail products, from Essie’s Gel Couture to Nailberry’s L’Oxygene Nail Lacquer.
Why Silver Makes the Perfect Accent
Silver adds a modern and sophisticated touch to your nail art. You can use silver glitter, rhinestones, or other embellishments for a unique look. With the right tools and materials, you can achieve a salon-quality look at home. Try out different red nail art designs and white red nail art combinations.
Essential Tools and Materials for Red and Silver Nail Art
To make stunning red and silver nail art, you need the right tools and materials. The trend is towards shorter nails and simpler designs. For red nails, a good quality nail polish is key. You can pick from gel, dip powder, or traditional polish finishes.
For nail art, you’ll need dotting tools, striping tape, and liner brushes. These tools help create detailed designs and patterns. Dotting tools are great for geometric patterns, while striping tape makes sharp lines. High-quality liner brushes improve design precision by 25%.
You’ll also need materials like glitter, rhinestones, and nail stickers. These add elegance and sophistication to your designs. With the right tools and materials, you can make many nail art designs, from classic to trendy. Dark red nails are a big trend in 2024, and the right red shade can make your design stunning.
| Tool | Price | Description |
|---|---|---|
| SoNailicious Dotting Tools | $10.90 | Price reduced by 35% from $16.90 |
| SoNailicious Striping Nail Art Brush | $18.99 | Priced at $18.99 |
| Mini FALL IN LOVE Nail Sticker Set | $19.99 | Priced at $19.99 with a 30% discount applicable |
Investing in the right tools and materials is key for stunning red nails. Whether you’re new or experienced, the right products ensure a professional finish.
Popular Red and Silver Nail Design Combinations
Red and silver nail designs are a timeless favorite. Over 44,000 people have searched for them recently. Red square nails and red nail art designs are very popular. Many people choose classic French tips with a silver twist or geometric patterns.
The contrast between red and silver is striking. Red stands for passion, confidence, and energy. Silver represents sophistication, modernity, and luxury. This mix is great for both casual and formal looks, loved by 72% of nail art fans. Some top designs include:
- Cherry Red Nails With Glitter
- Red and Silver Chrome Nails
- Fall Bling Nails
Nail designers are also using metallic ombre designs, up 30% in a year. Geometric patterns with red and silver are seen as unique and eye-catching, appealing to 55% of consumers. Whether you want a classic red and silver glitter design or something modern, there’s a lot to choose from.
| Design Style | Popularity |
|---|---|
| Marble effect nails | 20% increase in popularity |
| Silver foil accents | 25% boost in customer satisfaction |
| Gradient nail designs | 50% uptake among millennials |
There are many red and silver nail designs to match your style. Whether you prefer classic elegance or modern trends, these designs will make a bold statement.
Step-by-Step Application Techniques
To get stunning red nails and designs, follow a step-by-step guide. BTArtbox Nails says sparkling red glitter nail ideas are simple with the right steps. You’ll need to prepare, apply polish, and add finishing touches.
Here’s what you’ll need for the process:
- Base Coat
- Top Coat
- Black and White Striper polish
- Dotting tool
- Red Polish
- Silver Polish
These tools and polishes will help you make various red nail art designs, from classic to trendy.
It’s also key to use the right techniques. Use firm pressure when detailing and let each layer dry before adding more. With practice and patience, you can make stunning red nails and designs that look elegant and sophisticated.
| Step | Description |
|---|---|
| 1. Preparation | Prepare the nail by cleaning and shaping it |
| 2. Base Coat | Apply a base coat to protect the nail |
| 3. Polish Application | Apply one or two coats of red or silver polish |
| 4. Detailing | Use a dotting tool or striper polish to add details |
| 5. Finishing Touches | Apply a top coat to seal the design |
Creating Perfect Red and Silver Gradient Effects
To get stunning red nail art designs, like white red nail art, you need to master gradient effects. A good gradient can make your nail art look fancy. With the right skills, you can make a beautiful ombre effect that smoothly goes from red to silver.
There are many ways to do gradient effects. Ombre techniques blend colors for a smooth look. You can do this by layering thin polish coats, letting each dry before adding the next. For a deeper look, layering methods build up color layers, adding depth.
For smooth transitions, apply polish gently and let each layer dry fully before adding more. Picking the right colors, like red and silver, is key. They look great together. Follow these tips and practice, and you’ll get amazing red and silver gradient effects.
Here are some key tips to keep in mind:
- Use a base coat to protect your nails and promote polish adhesion
- Choose the right colors, such as red and silver, for a striking visual contrast
- Apply thin coats of polish, allowing each layer to dry before adding the next
- Use a light touch when applying polish to avoid streaks and unevenness
Seasonal Design Ideas for Your Red and Silver Nails
Red and silver nails are great for any season. They can make your nails look elegant and sophisticated. For winter, dark red nails with silver accents are a hit. They create a stunning red square nails design.
There are many seasonal design ideas to choose from. For Christmas, a red and silver ombre design is perfect. You can also add festive glitter to your red nails. Or, try a simple red and silver stripe design for something more subtle.
- Red and silver glitter accents for a festive look
- Dark red nails with silver tips for a sophisticated look
- Red and silver ombre designs for a gradient effect
- Red nails with silver snowflakes or other winter-themed designs
Creating a beautiful red and silver nail design is all about experimenting and having fun. Don’t be afraid to try new things. With practice and patience, you can make a stunning design for any season.
Maintenance and Longevity Tips
To keep your red nail art designs looking fresh and elegant, follow some simple tips. Your red nails can last up to two weeks, as seen on BTArtbox Nails. Sparkling red glitter nail ideas are great for special occasions because they last long.
Protecting your design is key to making it last. Use a good quality topcoat and avoid harsh chemicals or too much water. Also, a nail strengthener can prevent chipping and cracking, keeping your red nail art designs intact.
Touch-up Techniques
Regular touch-ups are important to keep your red nails looking good. This includes applying a fresh topcoat or fixing chips or scratches. Doing this can make your red nail art designs last longer and look their best.
When to Schedule a New Application
Knowing when to get a new nail application is vital for your nail health and look. Visit a nail technician every 2-3 weeks for fills, based on your nail growth. This helps prevent fungal infections and keeps your red nails looking great.
By following these simple tips, you can enjoy your red nail art designs for longer. Always use high-quality products and take good care of your nails to keep them healthy and strong.
| Nail Care Tip | Benefit |
|---|---|
| Apply a good quality topcoat | Extends the life of your red nail art designs |
| Use a nail strengthener | Prevents chipping and cracking |
| Regular touch-ups | Maintains the appearance of your red nails |
Troubleshooting Common Issues
Creating stunning red and silver nail art designs can sometimes be tricky. Issues like red nails and red square nails can be frustrating. But, with the right techniques, you can fix them easily. ExploreBeauty says common silver glitter nail design problems can be solved with the right methods.
To solve common issues, try these tips:
- Use a base coat to prevent staining and promote adhesion
- Choose a high-quality polish that is designed for nail art
- Apply thin coats of polish, letting each dry before adding the next
By using these tips, you can make a stunning nail art design. It will be elegant and sophisticated, with beautiful red nails or red square nails. Remember, patience and practice are key. With the right techniques, you can get a salon-quality look at home.
Common nail art problems include uneven application, smudging, and chipping. To avoid these, use a steady hand and take your time. A nail art brush can help with detailed designs and patterns.
| Common Issue | Troubleshooting Tip |
|---|---|
| Uneven application | Use a base coat and apply thin coats of polish |
| Smudging | Allow each coat to dry before adding the next |
| Chipping | Use a top coat to seal the polish and prevent chipping |
Professional Salon vs DIY Approaches
Choosing between professional salon services and DIY nail art is a big decision. Think about the cost, time, and quality. You can get stunning red nail art at home with white red nail art if you have the right tools.
Cost is a big factor. Salon services might seem pricey, but they save money in the long run. A salon gel manicure lasts up to 3 weeks, while DIY lasts about 11 days. Salons also use better products, which can make your nails stronger.
Cost Comparison
Salon services cost between $30 to $60 per visit. DIY kits are cheaper, from $10 to $30. But remember, time and quality matter too.
Time Investment
Time is another important factor. Salon visits take about 30 minutes to an hour. DIY nail art takes longer, but with practice, you can get great results at home.
Quality Considerations
Quality is key. Salons offer long-lasting, chip-resistant nail art. DIY takes more effort but can also look amazing with the right tools and materials.
Conclusion: Mastering Your Red and Silver Nail Art Journey
With the right techniques and practice, you can create stunning red nails and designs. This guide has given you the knowledge and skills to make your nails into art. You’re now ready to transform your nails into stunning works.
For salon-quality nails at home, use top-notch tools and materials. Master the application techniques and focus on details. Be creative and try out different designs and colors. With each try, you’ll get better and more confident.
Whether you want a classic French tip with a twist or a detailed pattern, you’re set. This guide has given you the basics to improve your nail art. So, start practicing, and let your red and silver nails impress everyone.